There are many ways we can give ourselves a guide to follow when setting out to carve a lino, or indeed wood, block.
I should say from the outset though, that I personally can see no point in simply tracing and drawing a ‘line’ image (one colour with no tones) – whether a drawing or a simplified photographic image – then slavishly carving and printing it as basically a reproduction of the original. Why bother with lino at all? Just an inkjet or photostencil screen print will look pretty much the same.
What appeals to me about linocuts etc. is the way the actual carving process can change, revise and develop the image. I have never made any secret of the fact that I often use a computer and Photoshop as a vital development tool in the early stages of my prints. But I also conventionally draw and tonally interpret from the computer-generated images’ - sometimes directly on the block. I will perhaps trace more precisely for certain elements such as text. But I then always allow the very ‘craft’ of the printmaking process and media being used to produce an image with its own unique character and textures.
However, I do like to be accurate and precise if possible. I do not believe in the ‘happy accident…if it’s a bit messy it must be art’ approach. But I also like to avoid tedious effort where I can!
Usually then, for lino prints, I will have some sort of an accurate ‘map’ from a or key drawing and/or photo-collage. Most often I will then use ordinary carbon paper and a fine ball point pen to trace down the key. I will then have source material in front of me: original tonal drawing and/or processed photo reference, and work on the block with pencil and pen – often as I go along with the all-important creative process of ‘drawing’ with the gouges.
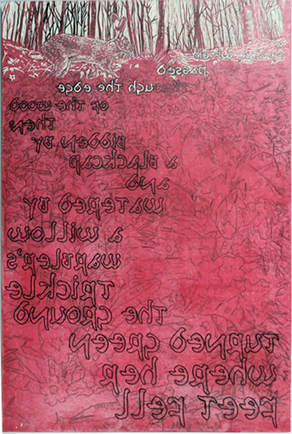
The tedious effort part of this process then is clearly just the tracing and transfer part; whether using carbon paper or ‘Tracedown’, or simply rubbing soft pencil on the underside of the key drawing. It can also lead to a degree of inaccuracy and a mess of confusing carboned lines; especially for some elements; for example when, as I often do, wish to incorporate and interweave text. On one occasion, I even went as far as making a reversed stencil and screen printing the complex image on to the lino block! But mostly I rely on the carbon paper plus pencil method. Here is the block I am currently working on.
So – what else?
I know it is possible to adapt the Japanese woodblock method of basically gluing an inked image down on to the block and then wetting and rubbing away the paper supporting it. This is also quite long winded as well as a bit messy and really more suitable for solid wood.
The problem too with the now almost ubiquitous inkjet prints most of us use to create such reference is that, being water based, the inks do not really dissolve as such. At least not sufficiently to give a good transfer to lino. As well as the gluing method I have tried printing inkjet on to non absorbent paper like baking parchment (too thin) or the backing paper from a sheet of used sticky labels or plastic sheet (too shiny) and pressing that on to a block - with no real success.
Many years ago, as a student (many many years!) I had played with using solvents or heat to ‘melt’ photocopies and print ‘collaged’ monoprints. I once even pressed images like this on to a lithography stone and got good results. Many photocopiers now do not use the heated roller or solvent and carbon powder method of producing prints, but ‘Laser’ printers do something very similar. These (at least at A4 size) have, like inkjet printers, become relatively cheap. So when I saw one reduced to less than £40, I thought I’d try and transfer some images printed on it down on to lino.
So for the last couple of days I’ve potentially been wasting my time, as well as lots of bits of lino blocks of various types, trying to get a clean transfer of relatively complex images printed on this little laser printer down on to lino. I say ‘complex’ as of course, there is little point in trying simple outline work which can be done simply with carbon paper or similar. Clearly though, the images had to be made initially fairly ‘tone free’, as I was not expecting miracles! Here are the first results.
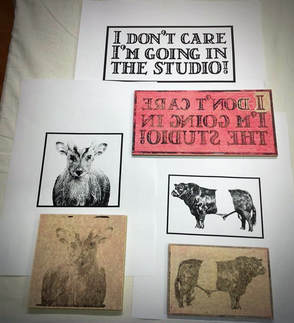
First attempts. Mixed success.
I began by using solvent to melt the laser carbon ink sufficiently to press down and transfer to the lino. The solvent (I know, I know , its horrible toxic stuff, but needs must and its tiny amounts) has to be acetone or screenwash or similar; white spirit etc won’t work. It is applied to the back of the laser print paper sufficient to soak through but not drip and run. I used a spray screen cleaning solvent and also brushed on screenwash.
Now the tricky bit: the excess liquid solvent must be evaporated to stop smearing but leaving the ink of the image still sufficiently sticky to print down on to the lino. I tried using the press, but got better results with spoon/baren rubbing the paper – just like taking a print from an inked block. As you might guess, first results were either a) too much solvent and a smudgy useless transfer, or b) patchy, with bare areas which would have to be hand drawn in.
I then tried a slightly simpler image (the text for another experiment – lino printed T shirts!) and used the ‘iron-on’ method: The laser print is placed on the block, covered with baking parchment and ironed down with a domestic iron - using sufficient heat and pressure to melt the ink on to the block. This was slightly better, but again, a fine balance has to be arrived at between using enough heat and dwell time and overdoing it to actually scorch and blister the lino.
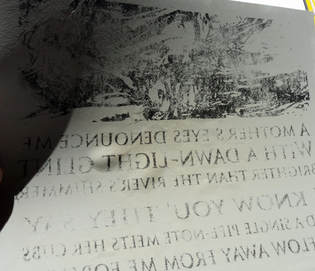
The result of too high a temperature and too long ironing!
I continued to try different options and also different lino surfaces. I normally stain/colour my preferred ‘Marmoleum’ flooring lino, but tried some without and also some plain grey ‘artist’s’ lino. I doubt whether the vinyl type lino alternatives would stand up to either solvent or heat (and I hate the horrible rubbery stuff anyway!)
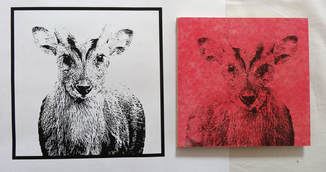
Best result with the iron.
left: laser print
right: transferred image.
left: laser print
right: transferred image.
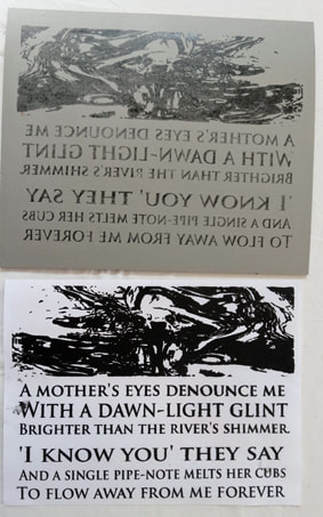
Best result with solvent and rubbing down.
Top: grey artists lino with reversed image OK for carving.
Bottom: smudged laser print (not reusable for multiple blocks as the ironed ones might well be.)
Top: grey artists lino with reversed image OK for carving.
Bottom: smudged laser print (not reusable for multiple blocks as the ironed ones might well be.)
So …conclusions?
As always – more work needed. I can see heat transfer of laser prints being useful for simpler, bold images that would be tedious to trace down accurately. And it might well (with more practice at getting a good transfer) suit more complex imagery which could then be subject to ‘on block’ conversion with the gouges in much the same way as my pencil tone work.
As always – very interested to hear how others get on!
 RSS Feed