A while ago I wrote a piece about my favourite Pfeil gouges - and in that I said:
“Most important of all, your tools must be sharp and kept sharp. A quality gouge will not only take a good edge, but with practice, can be quickly ‘stropped’ to retain it.”
It is possible to send your tools away and have them professionally re sharpened, but really It is best to learn to keep them in full working order at all times. Little and often is the key and a quick check and strop before each carving session should be part of your creative preparation ritual.
It may be, with heavy regular use and lots of sharpening, that they will eventually need to be re-ground. Again though, with some thought, practise and the right kit, it is possible to also do this yourself. Here though, will deal with the day to day sharpening and maintenance of your all important tools. You simply cannot control the quality of a relief cut image with blunt blades!
The other thing to remember is that a blunt gouge is actually more dangerous than a sharp one. Having to put extra pressure into your cuts is what leads to slips and the hand steadying the block against that pressure is more likely to be in the way!
So why not use some of the extra time many of us have at the moment and practise sharpening and maintaining your gouges? As always – I must stress this is my approach to the job. Others will do things differently – but will end up with the same result!
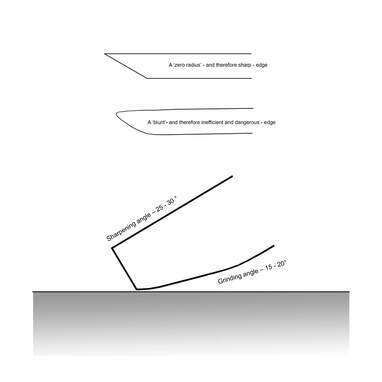
So what is a correctly sharpened gouge? First, very obviously - the edge doing the cutting should have a ‘zero radius’ – a perfect sharp angle where the two sides of the tool’s cutting edge meet. Consistency of angles are what the whole process of efficient sharpening is about.
The second objective is to have this sharp cutting edge meeting the print surface in an effective and comfortable way. If the sharpened edge has too steep an angle, the gouge will have to be held at an awkward height in the hand to work; and will either dig in too readily or skid on the surface. Too shallow an angle, and the edge will be difficult to get sharp in the first place and will also tend to slip out of the cut.
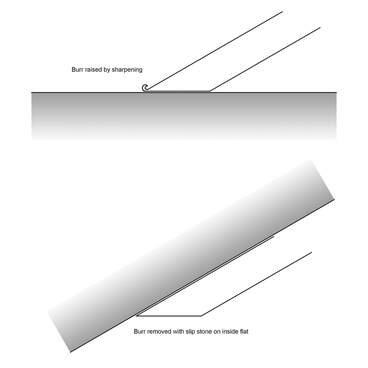
If you look at a brand new professional gouge – such as the Pfeils we have been talking about, you will see that there are actually two angles at the cutting edge: The ‘grinding’ angle – which is quite shallow – around 15 - 20°. Then if you look closer you will see that the actual cutting edge is a little steeper – 25 - 30°, on the outside edge; and – importantly - it meets a flat, smooth surface on the inside of the gouge. The meeting of the inside and outside edges is regular and even - and of course sharp, with absolutely no visible ‘radius’ catching the light on the cutting edge whatsoever.

Over the years I have acquired all sorts of bits of sharpening equipment, but there are really just a few key items that you will need to keep that razor sharp edge on your quality gouges
A fine grit sharpening stone with a decent flat surface. A brief word about sharpening stones. The abrasive grade of stone etc is measured in ‘grit’ numbers: the higher the grit number - the finer the surface. The very finest stones are naturally mined and often called ‘Arkansas’ stone. There are many man made sharpening stones where the grit size is controlled. Some stones work best with just a little oil; others – usually the synthetic ones - are called ‘water stones’ and are designed to be soaked in water before use. I tend to use a light oil on all my stones.
Do not get confused by the term ‘whet’ stone though. To whet (note the ‘h’) simply means to sharpen; and although water or oil as a lubricant is always a good idea, it doesn’t necessarily mean the stone has to be soaking wet.
For small tools you do not generally need a big expanse of flat surface. But with the smaller softer stones, after repeated use in the same spot, it is possible to wear a depression in the stone. This is not too much of a problem for U gouges – but of course, not so good for the flat edges of V gouges.
- One or two ‘slip’ stones with either or both V and U edge profiles
It is of course possible to combine your flat surface and slip stone in one. Jacksons supply a cleverly designed Japanese synthetic waterstone with good flat (if quite soft) surface, that also has V and U edges graduated to fit different gouge profiles. I have modified mine further by shaping the stone to even smaller V and U profiles at either end.
I do also particularly like my little Arkansas stones; one of which has a small V edge profile, but is just big enough to use on the flat side too. I also have a very hard vintage stone I inherited from a wood engraver.
’Stropping’ equipment. It is remarkable how beneficial (and in the long run - time saving) it is to have your strop to hand and to give your gouges an occasional little ‘whizz up’ as you work.
The idea of stropping is simply to maintain and refine your already efficiently sharpened edge; by polishing off the microscopic scratches and unevenness left by even the finest of stones and keeping our zero profile cutting edge super sharp. It also slightly ‘rounds off’ the difference between the grinding and sharpening angles – giving a smooth profile to the underside of the gouge.
The equipment required consists of a piece of unpolished leather and some soft wood shaped into suitable V and U profiles; plus polishing compound or cream. You can make your own by fixing a piece of leather to a board and cutting matching grooves or profiles in a piece of close grained softish wood.
However, one of the most useful and common items for this job is the ‘Flexcut Slip Strop’; which has all you need in one neat and handy pack.
So – let’s get on and do some sharpening!
Here's a video which will hopefully make everything clear.
Keep Safe!

 RSS Feed